a manufacturer of unmanned surface craft models
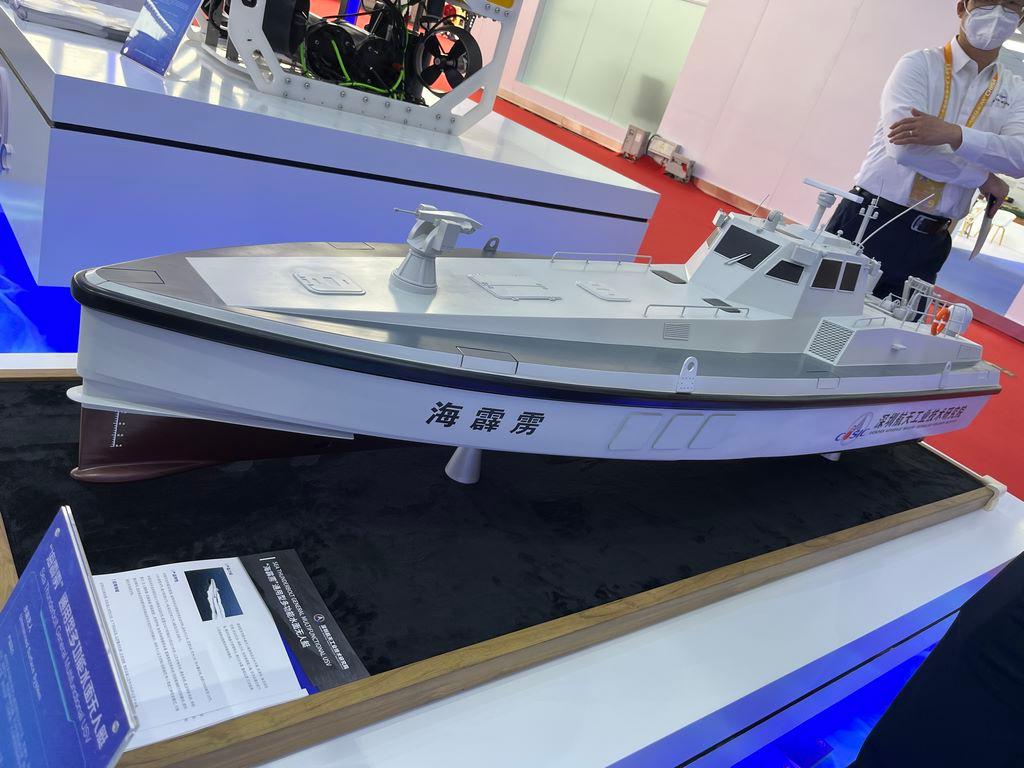
Case study on the production of a model of a Hai Lei Li unmanned surface vessel
The "Hai Lei Li" surface unmanned boat model produced this time is based on a 1:50 scale, with a target restoration rate of over 90%. The core goal is to accurately present the streamlined hull, precise sensor layout, and detailed features of the original boat through the application of composite materials of photosensitive resin and ABS while ensuring structural strength. Below is a complete restoration of the entire production process, from material selection, manufacturing techniques to post-processing.
1、 Material selection: balance between functionality and details
The main body of the model is made of ABS+photosensitive resin composite material, which balances strength and accuracy requirements:
ABS main structure: used for large-sized components such as hull shells, deck platforms, and superstructure frames that require slight external forces (such as display placement and light touch). ABS has good toughness and strong impact resistance, which can prevent the model from breaking due to its own weight or accidental collision. At the same time, the surface can be polished to a smooth finish, making it suitable as a basis for subsequent coloring.
Photo sensitive resin details: used for small or high-precision components such as radar arrays, photoelectric sensors, communication antennas, railings, cabin door handles, etc. The photosensitive resin has high molding accuracy (fine layer texture), which can clearly reproduce the complex curved surfaces of the original boat (such as the curvature of the radar cover) and small structures (such as screw holes with a diameter of 2mm). The surface has a slight luster and can present an "industrial texture" without additional polishing.
2、 Production process: precise molding in stages
The model production is divided into four stages: structural disassembly, 3D printing, component correction, and assembly, with the core of "restoring the original boat features" throughout the process.
Structural disassembly and data preprocessing
Firstly, based on the original boat design drawing (or actual boat photo measurement), the model is disassembled into six core components: hull shell (including streamlined bottom), deck platform (including equipment installation position), superstructure (including cockpit and sensor bracket), propulsion system (propeller and guide pipe), sensor group (radar/optoelectronic equipment), and detail decoration (railing, identification, cabin door).
In response to the differences in characteristics between ABS and photosensitive resin, components are allocated for "functional adaptation": for example, the hull shell of the boat needs to be subjected to overall force and has a single curved surface, so ABS printing is used; The radar cover needs to present a transparent curvature (the original boat was made of transparent material), so it is printed with photosensitive resin and polished twice to achieve a semi transparent effect.
3D printing and basic post-processing
ABS component printing: FDM equipment (or photo cured ABS resin) is used for printing, with a layer thickness of 0.2mm to balance accuracy and efficiency. Optimize the support structure through software before printing (only add thin pillars in suspended areas) to reduce post-processing workload; After printing is completed, use a hot air gun to gently blow away residual support, and then use 400 grit sandpaper to polish the layer pattern. Pay attention to the joint between the deck and the hull to ensure a smooth joint surface.
Printing of photosensitive resin components: using DLP equipment with a layer thickness of 0.05mm to capture details. After printing, soak and clean the uncured resin in specialized alcohol, and then cure it again with a UV lamp for 20 minutes to increase its hardness; For transparent parts such as radar covers, additional polishing cloth wheels are used to manually polish them, reducing the haze and making them approach the "sub light transmission" texture of the original boat.
Component correction and pre assembly
The printed part may have local deformation (such as ABS hull edge warping), which needs to be trimmed with a micro file; If there is a dimensional deviation (error>0.5mm) in precision components such as sensor brackets, they can be repaired through AB glue fine-tuning or secondary printing. Key inspection during pre assembly: ① The fit between the hull and deck (ensuring no misalignment); ② The relative position between the sensor and the superstructure (consistent with the original boat drawing); ③ The coaxiality between the propeller and the duct (to avoid deflection after assembly).
3、 Post processing: from "raw model" to "high fidelity finished product"
The core of post-processing is to transform the "plastic feel" of printed materials into the "industrial feel" of real equipment through coloring and texture shaping. The key steps are as follows:
Primer sealing and defect covering
All components are first sprayed with a layer of gray epoxy primer (or model specific cover primer), which is used to seal the fine pores of the printing layer (ABS is prone to color absorption, photosensitive resin may yellow), and provide a uniform substrate for subsequent coloring. For the layer pattern of ABS printed parts (even if there are slight traces after polishing), use fine water to touch up the soil and lightly sweep to enhance the surface roughness and improve the adhesion of the topcoat.
Fine grained coloring of different regions
Referring to the actual color scheme of the original boat (assuming the main color of the hull is "ocean gray" and the superstructure is "shallow sea blue"), the "shading+gradient" technique is adopted:
Hull shell: Use masking tape to divide the gradient area of "deep gray at the bottom of the ship → medium gray on the side of the ship → light gray on the deck", and use a pneumatic spray pen to spray 3-
4 layers at a distance of 40cm, with a 15 minute interval between each layer, simulating the natural transition of the metal surface; The bottom of the ship has been exposed to seawater for a long time, and additional dark brown solid paint has been used to spot dye the "rust stains" (concentrated at the weld seam).
Superstructure: First spray a shallow sea blue base color, then use deep blue masking tape to trace the edges of the windows and equipment installation positions, and thin spray a layer of deep blue overlay to form a three-dimensional shadow; The cockpit glass area is hand painted with transparent blue paint, and then covered with an extremely fine layer of silver metallic paint (simulating glass reflection) after drying.
Sensor group: The radar cover is painted with semi transparent light gray paint (simulated transparent material), and the internal circuit is hand drawn with a very fine pen with white wires; The photoelectric sensor lens is covered with transparent red paint, and the edges are painted with silver paint to represent the "light-emitting module".
Texture enhancement and protection
After all coloring is completed, spray a layer of transparent matte protective paint (thickness should be controlled to avoid masking details), which can enhance color saturation and increase the real touch of the surface "plastic/metal". Finally, dip a cotton swab in a small amount of matting agent and gently wipe the "frequently contacted parts" such as railings and screws to simulate "slight wear and tear" after long-term use, further improving the restoration degree.


